Pages

Thursday, 30 April 2015

Alcohol Inks: Pearl Additive

Evening all!
I've been a bit off-beat with my posts over the last week because I've been busy with all my case studies and homework for my VTCT nail course! I'm almost there, I should be able to hand it all in for marking in the next week or two, yay! I'll then have some exams and my practical assessment to do and that's it, I'll be qualified at last. The end is in sight so I must keep going!... I have managed to pull out my alcohol inks for a quick play though. Being the addicted shopper I am, when I bought my inks I had to see what 'accessories' I could get go with them and I found additives online, pearl was my favourite so here I am dipping my toe in new waters...

adirondack-alcohol-inks-pearl-additive-nail-art

I started with two coats of white as a base and waited for it to dry fully. I then took my alcohol inks and dropped each on to it's own little sponge, patting them on to the nails and blending with the solution one finger at a time. Once the colour was as I wanted I took the pearl additive on another sponge and gently went over the top, a word of warning, a little goes a REALLY long way hahaha! I fixed the inks with a quick spritz of hairspray before finishing with topcoat.

adirondack-alcohol-inks-pearl-additive-nail-art (2)

I luuurve this look, it's very boho, very me! It's so loose and dreamy and makes a beautiful mani in it's own right but also makes a great base for further nail art... I will show you that tomorrow ;) The pearl additive is just lovely, it on it's own would be enough to transform any standard polish manicure and I can't wait to try it in some different combinations!

alcohol-ink-additive-nail-art
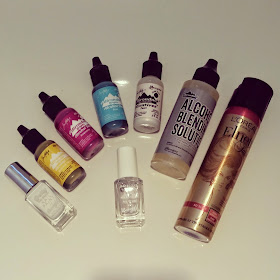
Barry M: Cotton, 3in1. Adirondack Alcohol Ink: Sunshine Yellow, Raspberry, Pool, Pearl Additive, Blending Solution. Elnett: Hairspray.

If you haven't had a go with inks yourself I highly recommend trying them out! Anyone can make a striking mani out of a plain base with just a few dabs of the sponge and it cleans up so easily with the blending solution; they'll also last for yearrrrrs. I got mine from Hobbycraft and from various shops on Amazon, never more than £3.00/ea.

Rebecca x

Monday, 27 April 2015

Pick 'N' Mix Challenge: Oceanic & Three Neons

Oooh neon two weeks in a row, this makes me a happy nail artist! I love neon in spring and summer... This prompt was also a perfect opportunity to re-hash a mani that I LOVED last year, my Under The Sea manicure from the Fingerfood theme Buffet challenge, I changed up the base a little this time round though, I wanted more contrast...

sparkly-neon-ocean-cute-creatures-nail-art

The base is two thin coats of 'A Mermaids Tale' which is a lovely sheer blue jelly polish with blue and green glitters and hexes. I next used a small detail brush to paint on my little fish, starfish and eels with the neon colours. I added the whites of the eyes with polish and a dotting tool before using a black nail art pen to add pupils. Finished with topcoat.

sparkly-neon-ocean-cute-creatures-nail-art (2)

Ahhh, these lil creatures are super cute! I still love this mani as much as I did last year and it's getting me excited for my summer holiday :) Happy days at the beach!

under-the-sea-nail-art
Sally Hansen: A Mermaids Tale. Models Own: Sun Hat, Flip-Flop, Beach Bag. Barry M: Coconut, 3in1, Black Nail Art Pen. Amazon: Dotting Tool. Ebay: Detailer Brush.

See what the other lovely lades in the group have been up to below...

Rebecca x

Friday, 24 April 2015

Geometirc Daisies

Ahhhh.... Friday night....
Before I go all rock 'n' roll and take myself off for a hot, bubbly bath, I thought I would share this daisy manicure which I did on top of the Barry M Sunset polish - You Drive Me Navy a full four days after the paint dried on my swatch! There's no significant tip wear or chips to speak of despite doing dishes, spring cleaning and even a spot of gardening!! Impressed again!! You can see my swatch post HERE. I'm a sucker for a daisy mani in spring time and I usually go for a loose freehand style as seen HERE back in January, but this time I went for this very pretty, geometric style print on one of my MoYou London plates...

barry-m-you-drive-me-navy-daisy-nail-art

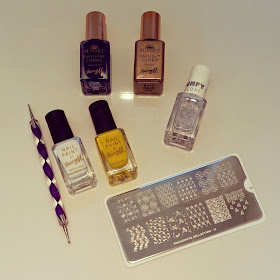
So the base is two coats of this stunning deep blue with the Sunset topcoat. I then (several days later) stamped the floral print with an old bottle of  Bazza white, the old sticky bottles of polish usually make for great stamping ;) I finished by dotting on the yellow centres over the white and giving a lick of plumpy topcoat.

barry-m-you-drive-me-navy-daisy-nail-art (2)

I adore this print, especially in these colours! It would be a lovely design for a journal or notebook cover, or maybe even a pair of palazzo pants!

spring-daisy-nail-art
Barry M: You Drive Me Navy, Sunset Topcoat, White, Yellow, Plumpy Topcoat. MoYou London: Fashionista 12. Amazon: Small Dotting Tool.

Have a fabby weekend loves!

Rebecca x

Wednesday, 22 April 2015

Humpday Hare: King Of Carat Flowers

Good evening lovely ladies!
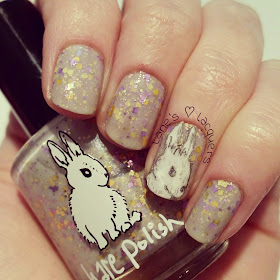
Tonight I've got something a bit different to show you... First up, I'm part of a Hare Polish Appreciation group on Facebook where each Wednesday some of the ladies share their humpday mani's using a Hare Polish and after months of watching on, I decided to jump in and join in this week! I chose King Of Carat Flowers because I knew I wanted to do the hare motif as my accent nail art, it is Spring after all and Hares and 'carats' seemed a fun match. Secondly, it's a bit different because the nail art method I used is a new discovery to me and was a total accident.... TRACING PAPER!!!

humpday-hare-polish-king-of-carat-flowers-nail-art

This is three thin coats of the Hare with topcoat. Now the accent nail... I was drawing out my design on paper, deciding between whole hare or head of hare; I settled for head when I realised it would be a great fit on my still nubby nails. To make sure of this I whipped out a bit of old tracing paper and a pencil to trace the head from the bottle before cutting it out with a craft blade to line up - perfect match! I was about to draw it out with a white nail art pen when I thought - Why not just stick this on??? I coloured the back of the paper with the white nail art pen and while still wet, placed on the nail. I then gave a quick spritz of hairspray to fix the pencil and topcoated twice...

humpday-hare-polish-king-of-carat-flowers-hare-nail-art

I never really expected this to work; surely the pencil will smudge, the paper edges will curl, it'll be a manky mess... But no!?! I'm chuffed with how it looks and how smooth it feels, you just cannot tell it's tracing paper under there! I love the sketch-like look of the hare, though I shouldn't really be surprised given that it is in fact a traditional sketch, paper and pencil!

hare-polish-tracing-paper-nail-art
 Hare Polish: King Of Carat Flowers. Barry M: 3in1, White Nail Art Pen, Daler & Rowney: Tracing Pad, Soft Pencil, Craft Blade.

I love a happy accident and just think of the possibilities!...

Rebecca x

Tuesday, 21 April 2015

Pick 'N' Mix Challenge: Neon & Indie

What a beaut of a day loves! 
I spent another afternoon pottering in the garden and the sun was soooo lovely on my face... This week's promtps are perfect for a hot summer mani to match and I knew exactly what combination I was going to use. Grey and neon are a favourite duo of mine and the best of both in my collection are Picture Polish LakoDom and the Models Own Suntan Shades...

picture-polish-lakodom-neon-tribal-print-nail-art

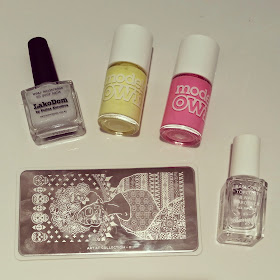
I used three thin coats of the PP for the base to build the holo and opacity up. I next stamped with the neons using the tribal pattern part of the MoYou London plate, I was impressed with just how well the Models Own performed actually! Finished with a coat of Barry M 3in1.

picture-polish-lakodom-neon-tribal-print-nail-art (2)

Lurrrving this look, even on my smalls I think the design holds up pretty well and there's enough of the grey peeking through to pick up the holo prettiness! Summerrrrr! Lol.

picture-polish-models-own-moyou-london-nails
Picture Polish: LakoDom. Models Own: Bikini, Shades. Barry M 3in1. MoYou London: Artist 11.

In case you didn't get to enjoy the blue skies today, here's a little peek at it from under the cherry blossom tree in my garden...

lanes-lacquers-cherry-blossom-tree-london-blue-skies

Back again tomorrow with a beautiful Hare Polish and a nail art discovery I made while designing the accent nail to go with it!

Rebecca x

Monday, 20 April 2015

Behind The Blog: The Stash

Hello beauties!
This stash post is a little delayed due to an unwelcome interaction between a rather large wasp and my foot while pottering in the nail room last night! Safe to say I screamed obscenities at it and then pummeled it to death lol! Anyways, after fifteen hours of pain it finally gave me a break so I could get going again... On to THE STASH!

We'll start off with the polish stored on the wall shelves I made - if you want to make some for yourself, you can check out my DIY Polish Shelf post.

lanes-lacquers-behind-the-blog-nail-polish-stash

This first group is mainly indies and some random high street brands which have crept into the space where old indies stood... I decided after my collection was getting out of control to stick to just a handful of my MOST favourite brands which are: Hare Polish, Picture Polish, Jindie Nails, Glam Polish, Polish Me Silly and Dollish... Any others randoms, I just couldn't bare to part with yet in my de-stash!... I noticed from this snap that the top shelf had dropped on the left, quickly rectified with the glue gun ;)

lanes-lacquers-behind-the-blog-nail-polish-stash (2)

Group two is a gorgeous collection of some high street loves: Models Own, Maybelline ColorShow, China Glaze and Nails Inc... The Bourjois were a gift from my bestie, all my fave blues. I just love the array of colours on this shelf!

lanes-lacquers-behind-the-blog-nail-polish-stash (3)

The final and favourite group, the Barry M collection! It also houses my OPI and Color Club favourites. This group is constantly growing, with Bazza's LOL. In fact those OPI now need rehoming because the Sunset's are here!... All total these shelves hold FIVE HUNDRED or more of my precious pretties...

Now we'll have a look at my nail art supplies...

lanes-lacquers-behind-the-blog-nail-stamping-stash

The stamping collection... That little purple box that has been with me since I was sixteen years old holds ALL of this (bar the huge cheeky plate)! I have just over forty MoYou London XL and Full Plates, and thirty or so mixed round/hexagonal plates from Cheeky, MoYou and She Sells Sea Shells. I have tried various stampers and the original pink Konad is still my absolute favourite with the square squishy from god knows where coming in second!

lanes-lacquers-behind-the-blog-nail-art-stash

Ahhhh, my gorgeous WAH Nails case always cheers me up! Inside the three elastic pockets on the right side I manage to squish those hundred or more stickers, transfers and vinyls; while on the left I store two sets of nail art tools, brushes and pens in the elastic hoops; one set for blogging and one set for pro use. In the middle is the handy zippy bag where I store all those striping tapes, foils and 3D nail decorations like bows, steam-punk pieces and googly eyes haha! I also keep my set of mini acrylic paint pots in this case.

lanes-lacquers-behind-the-blog-nail-art-stash (2)

These are all the little extras that live in seperate areas... First up the pigments and glitters in the top left which mainly live in the pro kit (below) for acrylics and gels, but occasionally come out to play with regular polish for the blog. Top right is a little bag of stud and diamante wheels that tends to stow away in the WAH case. Lastly, the bottom two snaps are my alcohol inks and nail essentials kit which live happily together on my nail desk.
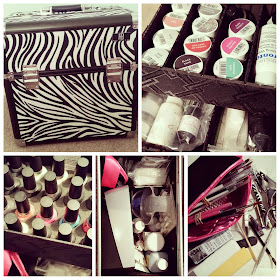
lanes-lacquers-behind-the-blog-nail-tech-kit-stash

As mentioned above, the pro kit... This is a Roo Beauty Mamba case, an awesome present from my mumsy when I started nail school training eighteen months ago! Top right are two little drawers, the bottom one is split in two and houses my NSI Attraction acrylic kit and Star Nails fibreglass and silk kit. The top one is home to my Cuccio Pronto gel polish supplies. Bottom left is my Cuccio Color and Veneer polishes. In the centre is the bulk of my nail tech kit including UV lamp, manicure products and my pro tools and brushes which are kept in that Bazza bag pictured bottom right.

lanes-lacquers-behind-the-blog-odds-and-ends-stash

We're finally at the end guys, this is the stocks and spares... Up top is a shoebox full of polish that I need rid of LOL... There's roughly one hundred indies, high ends and high streets in there now so I really must re-do my de-stash!!! Bottom left is my drawer of pro kit stock and bottom right is another shoebox of polish that was once on the shelves and a load of nail art goodies I rarely, if ever use.

WOW
That took blooming ages! I really hadn't realised just quite how much stuff I had managed to accumilate over the last couple of years, it's a little crazy?!!... But hey it's my passion, I love it and it makes me happy! Hope you enjoyed this little nosey behind the scenes...

Next week: Nail Tech Study Update

Rebecca x

Friday, 17 April 2015

*NEW* Barry M: Sunset Collection

Evening lovely loves!
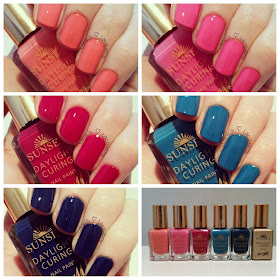
After a ten day nightmare with Royal Mail, I have at last got a review and swatches of five of the new Barry M Sunset polishes for you. They claim to give you a gel-like manicure with a topcoat that cures in daylight as opposed to a UV or LED light that you would use with a true gel polish. I will start off by saying that all of the non-gel 'gel' polishes I have tried to date have resulted in, well, nothing at all like a gel polish finish. So lets just say I didn't have high hopes... But I was pleasantly surprised!!!

barry-m-sunset-daylight-curing-polish-collection-swatches

First thing I noticed was that the formula was quite a bit thicker than the usual Bazza's, it also smelled different - stronger, but wasn't overpowering. I was also pleased to see the large flat brush as featured in the Speedy polishes and Plumpy topcoat. It's the topcoat rather that the colours themselves that cure in daylight and the instructions advise two thin coats of the nail paint followed by one of the topcoat...

barry-m-sunset-daylight-curing-peach-for-the-stars-swatch-manicure

This is Peach For The Stars a lovely coral (more than peach) shade, three coats with topcoat.

barry-m-sunset-daylight-curing-peach-for-the-stars-swatch-manicure (2)

***

barry-m-sunset-daylight-curing-ive-been-pinkin-swatch-manicure
Here's my favourite I've Been Pinkin' a lush, almost Barbie pink, three coats with topcoat.

barry-m-sunset-daylight-curing-ive-been-pinkin-swatch-manicure

***

barry-m-sunset-daylight-curing-fuschia-generation-swatch-manicure
 
Now for Fuschia Generation a beautiful winey, raspberry kind of colour, two coats with topcoat.

barry-m-sunset-daylight-curing-fuschia-generation-swatch-manicure (2)

***

barry-m-sunset-daylight-curing-the-way-you-make-me-teal-swatch-manicure

Next is my nearly favourite The Way You Make Me Teal a gorgeous blue, two coats with topcoat.

barry-m-sunset-daylight-curing-the-way-you-make-me-teal-swatch-manicure (2)

***

barry-m-sunset-daylight-curing-you-drive-me-navy-swatch-manicure

Last but no means least is You Drive Me Navy a stunning deep, deep blue, two coats and topcoat.

barry-m-sunset-daylight-curing-you-drive-me-navy-swatch-manicure (2)

***

So why was I pleasantly surprised??... Well, these polishes really do dry to a gel-like finish! I think they're almost as close as we're going to get with a non-gel polish; the finished result is a very smooth, super shiny and lacquer hard one which you just can't stop running your fingers over. It doesn't feel thick on the nail like gel does, but that's no bad thing! Just need to see if they are as hardy to wear and tear now... *Check out my Geometric Daisies manicure to see how they held up*

They do require the recommended two (the lighter shades really needed three) thin coats to build an even and smooth colour. The formula is thick but also dries fast and impatience in the form of thick coats or too-fast second coats, can result in a puckered, streaky mess lol! My mani's were touch dry in just a couple of minutes, dry to do light tasks within fifteen and dent proof in thirty; I have no idea if the sunny weather helped and I do wonder how they would fare with no daylight??! You remove them with regular nail polish remover and in my opinion they wipe away easier than normal polish.

I liked the names and the colours but it's really the formula that was the something new in this collection, overall I'm really very impressed and can't wait to see what shades will be coming in future...

Have a great weekend peeps!

Rebecca x

Wednesday, 15 April 2015

Pick 'N' Mix Challenge: Negative Space & Three Pastels

Hello there!
I had so many bright ideas for the designs for the next few prompts... But they've had to be scaled back a bit due to my poor tiny nails! Originally this dotticure was going to be accompanied by some tiny hand drawn flowers but on canvasses so small it would of ended up too smushed up lol. Even so, I quite liked this Japanese-y style simple nail art...

barry-m-negative-space-pastel-dotticure-nail-art

This was an all Barry M affair and first up was a lick of clear base coat... Then I took a medium dotting tool and dipped into each of the colours alternately, dotting in threes until I had the desired look. Finished with a final coat of three in one and popped the kettle on!

barry-m-negative-space-pastel-dotticure-nail-art (2)

I love how quick and simple this was, think of the bazillions of colour combinations you could do?! It's an ideal nail art for anyone and everyone to get a bit of pretty on their nails this Spring/Summer... Even with lil ones like mine! One trick to keeping the appearance neat is too make sure you cover the majority of the white free edge with dots ;)

barry-m-pastel-dotticures
Barry M: 3in1, Sky Blue, Fondant, Lemon Ice Cream. Small/Medium Dotting Tool (Amazon).

Rebecca x

Monday, 13 April 2015

Turquoise Inspired Manicure

Me again!
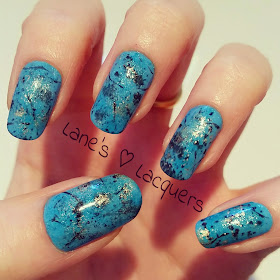
Before I get stuck in to some new nail art (despite my nubby nub nubs), I thought I'd better catch you up with a mani I shared on social media just before the ol' birthday. I was searching through pictures of my birth stone, aquamarine and came across a few random images of the lovely turquoise! I literally went straight to the nail room and created this...

models-own-diamond-luxe-turquoise-gemstone-nail-art

I started with two coats of Models Own Asscher Blue as my base followed up with sponging on some Adirondack alcohol ink in Pool (on sale in Hobbycraft at the moment) and giving a quick mist of hairspray to fix. I then sponged on some of the black spots and hints of gold using Barry M polishes. I finished by dipping a striper brush in the black polish to drag across the nails randomly creating 'veins' and topcoating with Barry M 3in1.

models-own-diamond-luxe-turquoise-stone-nail-art

I really liked this sort of abstract take on turquoise and I think the beautiful shimmery blue of the Diamond Luxe polish made for a perfect base?! I'm lusting after this nail length again, unfortunately I broke two nails right down to the quick over the Easter break (hence the nubby nub nubs)... Is it just me or does it take a few days to acclimatise to being able to feel things with the tips of your fingers again? Eeeeeurgh!

turquoise-manicures
Loreal: Elnett Satin. Models Own: Asscher Blue. Barry M: Black, Gold Foil, 3in1. Adirondack Alcohol Ink: Pool. Striper Brush (Ebay).

Me and my nubs will be back on Wednesday with the Pick 'N' Mix Challenge after enjoying some more of this warm spring sunshine tomorrow!

Rebecca x

Sunday, 12 April 2015

Behind The Blog: Turning Thirty!

Good evening beauties...
Today's post is a cheeky little addition to my Behind The Blog series, it's really just a chance for me to fill you in on the goings on during my absence and my experience of turning thirty!

The big birthday was couple of weeks ago now and it's a time in my life I've been looking forward to since I was about twenty-one LOL! My teens were a terrible time for me emotionally and I knew the hangover from that would last well into my twenties. I expected I'd need to get through A LOT of emotional untangling, discovering, learning, loving, hating and make heaps of decisions, half of which I would get wrong... And I was right hahaha! But through it all I drew comfort from my deep seated belief that at thirty, I would be where I needed to be and would have found 'home'... Right again! This is how I celebrated...

the-shard-southwark-london

My other half of many moons swept me off my feet and blew me away with a weekend of eating, drinking and shopping in London, topped off by staying at The Shangri-La at The Shard! A beautiful five star hotel at The Shard with stunning views and amazing service, I've never been anywhere like it and can't wait to go back!

floral-reception-display-shangri-la-shard-london

We checked into our room on level 49 and enjoyed having this amazing main view all to ourselves (they even provide binoculars so you can be a right nebby nora!)...

london-cityscape-view-level-49-shangri-la-shard-london

In the evening we had eats out and then drinks in the Gong Bar on level 52, after which we bumped into Suggs in the elevator where he wished me a happy birthday #madness! Sunday morning was spent indulging in a late breakfast to the room...

continental-breakfast-shangri-la-shard-london

...Followed by a dip in the infinity pool on level 52, swimming above St Pauls!!!

infinity-pool-shangri-la-shard-london

After the best of starts to the day we braved the open air view on level 72, then left the bags with the concierge to grab a final few buys and a coffee before heading home. What a place to reflect on and enjoy one of life's milestones... Best weekend ever with my favourite person in the world!

Which brings me back to being where I needed to be... Now thirty I am content with where my rollercoaster of a life has taken me; I'm happy in my skin, I'm safe and loved in the arms of a true soulmate, financially secure (as much as you can be these days) and full of passions and hopes and dreams for what is now, a better future than I could ever have imagined!!! I am home at last. I have an awful lot to be thankful for... It just goes to show that with a lot of strength and determination to fight through the world's bulls**t whilst holding on tight to your most precious values, and never settling for less than your heart desires, anything is possible. Even more than your dreams... Even with anxiety and depression!

Since the birthday I've gained a renewed belief that the universe will pop you right where you belong when you're ready to be there... I've also been busy doing job interviews, shopping, journaling, yoga and enjoying this unseasonably good spring weather. A much needed kind of calm has come over me and I just wanted to enjoy it a while before throwing myself back into the blog and nail tech study... But I'm back now!

Next week: The Stash

Rebecca x

Saturday, 11 April 2015

Extended Mini-Hiatus!

Hello loves!... Yes that's right I'm still alive LOL!

someecards-nail-memes-naked-unpainted-nails-first-world-problems

Apologies for this mini-hiatus turned extended break, absent without leave, missing in action thing; a bit like the ol' Pringles, once I popped I just couldn't stop hahaha! In the run up to my birthday and since, I've just enjoyed the extra free time a little too much and 'tomorrow' never came aka blogger burnout! I'll catch you up on all that in a sneaky Behind The Blog: Turning Thirty post tomorrow before getting back to painting my extreme nubbs of nails and other things next week!

Thanks for hanging in there folks!

Rebecca x