Hi loves :)
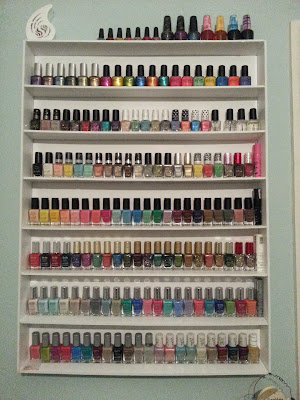
It's hump-day and I'm sure feeling it this week, it's been a rough one so far! So instead of a manicure, tonight I bring you a 'how-to' that I've had in the files for months! If like me you are drowning in your polish purchases, feel sad to hide all the pretties away in a drawer and love a project, then this may be just the thing for you... I now have three of them in my nail room and they have served me well for a bargain £10 a go and a little time and effort.
I've broken it down into ten steps which I will go through with you five at a time...
1. You will need 3 x A1 Foam Board, Glue Gun and Sticks, Tape Measure, Pencil and Craft Knife.
2. Measure out and draw lines across the width of the first board 4 1/2 inches apart using a spare board as a guide. This will be the back.
3. Measure out and draw lines across the width of the second board 2 1/2 inches apart. These will be the shelves.
4. Measure out and draw lines down the length of the third board 2 1/2 inches apart. These will be the sides.
5. Trim off the excess inch or so from the bottom of the first board with your craft knife.
6. Cut out the two lengths that you measured out on the third board with your craft knife.
7. Cut out the eight widths you measured out on the second board with your craft knife.
8. Glue the eight widths carefully on to the lines you drew on the first board. Best to glue along the lines and then place your widths. Run an extra line of glue along the joins that will be on the underside of your shelves for added stability.
9. Glue the two lengths into place, carefully lining up the front/back and top/bottom. Best to place the glue along the ends of the shelves and back board then place the length on top. Run an extra line of glue along the side joins on the back board for added strength.
10. Once all the glue is dry either screw or sticky tab your new shelving unit to the wall. I placed the screws top, middle and bottom, and near to the lower shelf so they'll be covered when filled with pretty polish!
I hope I've explained that well enough! Please ask questions if you have them!
In all, it should take no more than an hour to figure out and put together; by my third one, I was done in twenty minutes and it was my best one yet! You could also cut some inch wide strips to attach to the front of the shelves, hiding any bad cuts and stopping slippage; but I find this neat and secure enough and I don't like to hide the rainbow of colour! This is currently housing 129 Barry M's and 22 Color Clubs with 14 OPI's sitting along the top... And yes, I have two more shelves!...
...And a drawer, and a bag... LOL!
Rebecca x


I love your shelves and your collection :)
ReplyDeleteFantastic idea :)
Ahh thanks very much lovely :) x
DeleteThank you for the tip and advice on Insta, one last question. Where did you buy your A1 foam board from please? I'd like to use the same supplier - seeing as yours has stood the test of time.
ReplyDeleteMany thanks again
Lucy
Oh you're welcome! How did I not put that info in the post?! LOL... I got it all from Hobbycraft :)
DeleteFor the following wood divider shelf I will portray the Verona Scroll Shelf Kit. With the marriage of wood and created iron, this divider shelf will add exemplary loftiness to any room of your home. racking solution malaysia
ReplyDeleteKeep just those books apparent on your bookshelf that you view as fundamental for you.
ReplyDeleteavoid wasting electricity